Friday, December 27, 2013

An ETL Framework for Change Data Capture (CDC)

Change data capture (CDC) is the process of capturing changes made at the data source and applying them throughout the Data Warehouse. Since capturing and preserving the state of data across time is one of the core functions of a data warehouse, a change data capture framework has a very important  role in ETL design for Data Warehouses. Change Data Capture can be set up on different ways based on Timestamps on rows, Version Numbers on rows, Status indicators on rows etc. Here we will be building our framework based on "Timestamps on rows"  approach.

In one of the our early articles, we spoke about operational meta data logging framework. Lets add on to that and build our Change Data Capture framework. We will be leveraging the capabilities provided by Informatica PowerCenter to build our framework.

Framework Components

Our Framework for Change Data Capture will include below components.
    1. A Relational Table :- To store the meta data.
    2. Mapping, Workflow variables : Variables to store and process latest timestamp of processed records.
    3. A Reusable Expression :- A reusable expression transformation to find latest timestamp of processed records.
    4. Pre, Post Session Command Task :- Command task to collect the meta data.
    5. Reusable Worklet :- Worklet to log the data load details into the relational table.

1. Relational Table

A relation table will be used to store the operational data with the below structure. Data in this table will be retained for historical analysis.
    • ETL_JOB_NAME : ETL job name or Session name.
    • ETL_RUN_DATE : ETL job execution date.
    • DATA_START_TIME : Least timestamp of processed records
    • DATA_END_TIME : Latest timestamp of processed records
    • SRC_TABLE : Source table used in the ETL job.
    • TGT_TABLE : Target table used in the ETL job.
    • ETL_START_TIME : ETL job execution start timestamp.
    • ETL_END_TIME : ETL job execution end timestamp.
    • SRC_RECORD_COUNT : Number of records read from source.
    • INS_RECORD_COUNT : Number of records inserted into target.
    • UPD_RECORD_COUNT : Number of records updated in target.
    • ERR_RECORD_COUNT : Number of records error out in target.
    • ETL_STATUS : ETL Job status, SUCCESS or FAILURE.
    • ETL_CREATE_TIME : Record create timestamp.
    • ETL_UPDATE_TIME : Record update timestamp.

2. Mapping and Workflow Variables

Two mapping variables will be used to capture the least and latest timestamp of the records processed through each data load. These variables hold the time frame of the data processed.
  • $$M_DATA_START_TIME as Date/Time
  • $$M_DATA_END_TIME as Date/Time
Additionally two workflow variables will be used to capture the least and latest timestamp of the records processed through each data load. These variables hold the time frame of the data processed.
  • $$WF_DATA_START_TIME as Date/Time
  • $$WF_DATA_END_TIME as Date/Time
Note : Usage of these variables are described in the implementation Steps.

3. Reusable Expression

A reusable expression will be used to capture the least and latest timestamp of the records processed through each data load.

This expression takes the timestamp column as the input based on which Change Data Capture is setup. This expression transformation will find and assign the values to the mapping variables described above.

Below is the expression used in the transformation and the structure of the Reusable Expression Transformation.
    • SETMINVARIABLE($$M_DATA_START_TIME,DATA_TIME)
    • SETMAXVARIABLE($$M_DATA_END_TIME,DATA_TIME)
Informatica reusable transformation

4. Pre and Post Session Command Task

Pre and Post session command task will be used to generate a comma delimited file with session run details. This file will be stored into $PMSourceFileDir\ directory with a name $PMWorkflowName_stat.txt

Note :
  • $PMSourceFileDir$PMWorkflowName are the session parameter, which gives the source file directory and name of workflow.
  • File name generated will always be <WorkflowName>_stat.txt
The comma delimited file will have the structure as below.
    • ETL Start time
    • ETL End time
    • ETL Job name
    • Source table name
    • Target table name
    • Source record count
    • Records inserted count
    • Records updated count
    • Error record count
    • ETL Job status
We will be using the built-in session parameters to collect session run details.
    • $PMSessionName : Name of the Informatica session.
    • $PMSourceName@TableName : Name of the source table name.
    • $PMTargetName@TableName : Name of the source table name.
    • $PMSourceQualifierName@numAffectedRows : Number of records returned from source.
    • $PMTargetName@numAffectedRows : Number of record inserted/updated into the target table.
    • $PMTargetName@numRejectedRows : Number of records error out in target.
Note : SourceName, TargetName, SourceQualifierName will be replaced by corresponding transformation instance name used in the mapping.

Pre Session Command Task

Pre session command task will be used to create the file with the session start time stamp.
echo %DATE:~10,4%-%DATE:~4,2%-%DATE:~7,2% %TIME:~0,2%:%TIME:~3,2%:%TIME:~6,2%,
$PMSourceFileDir\$PMWorkflowName_stat.txt

Post Session Success Command Task

Post session success command task will be used to append the file, which is created in the pre session command with session run details. This will capture the SUCCESS status along with other session run details.
echo %DATE:~10,4%-%DATE:~4,2%-%DATE:~7,2% %TIME:~0,2%:%TIME:~3,2%:%TIME:~6,2%,
$PMSessionName,
$PMSTG_CUSTOMER_MASTER@TableName,
$PMINS_CUSTOMER_MASTER@TableName,
$PMSQ_STG_CUSTOMER_MASTER@numAffectedRows,
$PMINS_CUSTOMER_MASTER@numAffectedRows,
$PMUPD_CUSTOMER_MASTER@numAffectedRows,
$PMINS_CUSTOMER_MASTER@numRejectedRows,
SUCCESS,
>> $PMSourceFileDir\$PMWorkflowName_stat.txt

Post Session Failure Command Task

Post session failure command task will be used to append the file, which is created in the pre session command with session run details. This will capture the FAILURE status along with other session run details.
echo %DATE:~10,4%-%DATE:~4,2%-%DATE:~7,2% %TIME:~0,2%:%TIME:~3,2%:%TIME:~6,2%,
$PMSessionName,
$PMSTG_CUSTOMER_MASTER@TableName,
$PMINS_CUSTOMER_MASTER@TableName,
$PMSQ_STG_CUSTOMER_MASTER@numAffectedRows,
$PMINS_CUSTOMER_MASTER@numAffectedRows,
$PMUPD_CUSTOMER_MASTER@numAffectedRows,
$PMINS_CUSTOMER_MASTER@numRejectedRows,
FAILURE,
>> $PMSourceFileDir\$PMWorkflowName_stat.txt
Note :
  • Pre, Post session commands need to be changed based on Informatica server operating system.
  • Highlighted part of the script need to be change based on the source, target table instance name used in the mapping.

5. Reusable Worklet

A worklet will be created to read data from the comma delimited file generated by the pre, post session command task. In addition to the data read from the comma delimited file, the worklet takes Data Start Time and Data End Time as input parameters. Data Start Time and Data End Time is the time frame of the data processed records

Reusable Mapping

A reusable mapping will be created to read data from the comma delimited file generated by the pre and post session command task.

This mapping takes two input parameters, Create the mapping and add two mapping variables in the mapping as shown below.
  • $$M_DATA_START_TIME as Date/Time
  • $$M_DATA_END_TIME as Date/Time
Informatica mapping variable
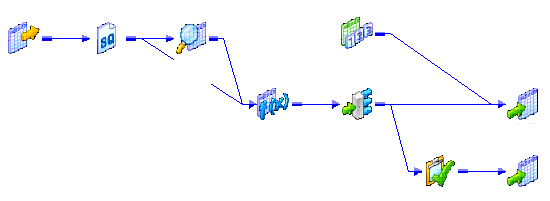
This mapping reads data from the file generated by the Pre, Post session command task. Mapping will include an expression transformation to generate the data elements required in the target table, with below OUTPUT ports, This expression transformation takes two input ports from the source file.
    • ETL_RUN_DATE :- TRUNC(SESSSTARTTIME)
    • DATA_START_TIME :- $$M_DATA_START_TIME
    • DATA_END_TIME :- $$M_DATA_END_TIME
    • ETL_CREATE_TIME :- SESSSTARTTIME
    • ETL_UPDATE_TIME :- SESSSTARTTIME
    • O_ETL_START_TIME :- TO_DATE(LTRIM(RTRIM(ETL_START_TIME)),'YYYY-MM-DD HH24:MI:SS')
    • O_ETL_END_TIME :- TO_DATE(LTRIM(RTRIM(ETL_END_TIME)),'YYYY-MM-DD HH24:MI:SS')
Informatica Expression transformation
Below is the complete mapping structure, created to populate target table 'ETL_PROCESS_STAT' 


Reusable Worklet

Reusable worklet is created based on the mapping created in the last step. Create the worklet and add two worklet variables.
  • $$WL_DATA_START_TIME as Date/Time
  • $$WL_DATA_END_TIME as Date/Time
Informatica Worklet

Now create the session in the worklet, which will be configured to read data from the file created by the pre, post session command as shown below. This session is based on the reusable mapping created in the previous step.
etl framework session

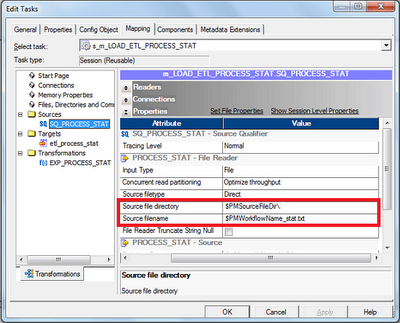
Note : Make sure the Source File Directory and Source File name are given correctly based on the file generated by pre/post session command

Assign the worklet variables to the mapping variables as shown below, using the pre-session variable assignment option in the components tab.

Informatica worklet variable assignment

With that we are done with the configuration required for the worklet.
informatica worklet

Framework implementation in a workflow

Now lets see how we implement the Change Data Capture Frame work in a mapping.

Mapping

Lets start the mapping creation and add two mapping variables as shown below.
  • $$M_DATA_START_TIME as Date/Time , Initial Value 12/31/2050 00:00:00.000000000
  • $$M_DATA_END_TIME as Date/Time , Initial Value 12/31/2050 00:00:00.000000000
Note : Give the initial value for both the variables
Informatica mapping variable
Add source and source qualifier to the designer work space, open the source qualifier and give the filter condition to get the latest data from the source.
  • STG_CUSTOMER_MASTER.UPDATE_TS > CONVERT(DATETIME,'$$M_DATA_END_TIME')
Hint : Use the column in the filter condition, based on which the Change Data Capture is built up on.

Add the Reusable Transformation 'EXP_CDC_TIMESTAMP' to the mapping and map the column 'UPDATE_TS'  from the source qualifier to the input port of the expression.

Hint : Use the column from the source qualifier, based on which Change Data Capture is built on. 
Note : The reusable transformation will find the least and latest timestamp and will store in the mapping variables, which can be used in the subsequent runs.
Map the DUMMY column from 'EXP_CDC_TIMESTAMP' to the down stream transformation and complete all other transformation required in the mapping. 

Workflow

Once the mapping is complete. lets create the workflow and add two workflow variables as shown below.
    • $$WF_DATA_START_TIME as Date/Time
    • $$WF_DATA_END_TIME as Date/Time
informatica workflow variable
Create the session in the workflow and add the Pre, Post session commands, which creates the flat file with the session run details.

Now map the mapping variables to the workflow variables as below.

Add the worklet to the workflow and assign the workflow variables to the worklet variable as in below image.

With that we are done with the configuration. And below is the structure of the completed workflow, with Change Data Capture Framework.
informatica workflow

SCD Type 6, a Combination of SCD Type 1, 2 and 3

In couple of our previous articles, we discussed how to design and implementSCD Type1, Type 2 and Type 3. We always can not fulfill all the business requirements just by these basic SCD Types. So here lets see what is SCD Type 6 and what it offers beyond the basic SCD Types.

What is SCD Type 6

Its a hybrid approach, a combination of all three basic SCD techniques, hence its named 1+2+3 = 6. Type 6 is particularly applicable if you want to maintain complete history like Type 2 and would also like to have an easy way to effect on current version like Type 3.
MANO
  • Type 2 : To track the historical changes as they occur.
  • Type 3 : To include the "Current" attribute.
  • Type 1 : Type 3 attribute is updated as Type 1 attribute.
Lets see consider Customer Dimension, which is modeled as Type 6. This dimension will have two INCOME GROUP attributes, one to capture current and other to capture the historical changes. Initially the customer is in LOW income group, so both income attributes have the same values.

Below image shows the initial data in Customer Dimension.

When the customer's income group is changed, a new dimension record is added to keep the historical changes for the customer. In the new dimension record current income group will be identical to income group. For all previous instances of customer dimension rows, the current income attribute will be overwritten to reflect the latest value.
Subsequent changes are also treated the same.

With this hybrid approach, we issue a new row to capture the change (type 2) and add a new column to track the current assignment (type 3), where subsequent changes are handled as a type 1 response.

When to Use SCD Type 6

Data warehousing teams are quite often asked to preserve historical attributes, while also supporting the ability to report historical performance data according to current attribute values. SCD Type 6 is the answer for such requirements.


If you want to see the historical facts based on the current attribute values, we will filter or summarize on the current attributes. If we summarize on the historical attribute, we will see facts as they sum up at a point of time.

Here is our Customer Dimension example, we can use INCOME_GRP column to see the facts values at a point of time and CURR_INCOME_GRP to get the historical fact values based on the current attribute value.

Thursday, December 26, 2013

SCD Type 4, a Solution for Rapidly Changing Dimension

SCD Type 2, is design to generate new records for every change of a dimension attribute, so that complete historical changes can be tracked correctly. When we have dimension attributes which changes very frequently, the dimension grow very rapidly causing considerable performance and maintenance issues. In this article lets see how we can handle this rapidly changing dimension issue using SCD Type 4.

What is SCD Type 4


SCD Type 4 design technique is used when SCD Type 2 dimension grows rapidly due to the frequently changing dimension attributes. In SCD Type 4,  frequently changing attributes will be removed from the main dimension and added in to a Mini Dimension.
To make the explanation easy, lets consider a customer dimension with the following structure.
SCD Type 4, a Solution for Rapidly Changing Dimension
Customer attributes such as Name, Date Of Birth, Customer State changes very rarely or do not even change, where as the Age Band, Income Band and Purchase Band is expected to change much frequently.

If this Customer dimension is used by an organization with 100 million customer, can expect this dimension to grow to 200 or 300 million records with in an year, assuming that there will be at least two or three changes for a customer per year.

Adding Mini Dimension

We can split the dimension into two dimensions, one with the attributes which are less frequently changing and attributes which are frequently changing as in below model. The frequently changing attributes will be grouped into aMini Dimension. 


The Mini Dimension will contain one row for each possible combination of attributes. In our case all possible combinations of AGE_BAND, INCOME_BAND and PURCHASE_BAND will be available in CUST_DEMO_DIM with the surrogate key CUST_DEMO_KEY.

If we have 20 different Age Bands and four different Income Bands and three Purchase Bands, we will have 20 X 4 X 3 = 2400 distinct possible combinations. These values can be populated into the Mini Dimension table once and for ever with surrogate key ranging from 1 to 2400.

Note : Mini Dimension do not store the historical attributes, but the fact table preserved the history of dimension attribute assignment.

Below is the model for the Customer dimension with a Mini Dimension for the Sales data mart.

Mini Dimension Challenges

When Mini Dimension starts changing rapidly, multiple Mini Dimensions can be introduced to handle such scenarios. If no fact records are to associate main dimension and mini dimension, a fact less fact table can be used associate main dimension and mini dimension.

SCD Type 3 Implementation using Informatica PowerCenter

Unlike SCD Type 2, Slowly Changing Dimension Type 3 preserves only few history versions of data, most of the time 'Current' and Previous' versions. The 'Previous' version value will be stored into the  additional columns with in the same dimension record.  In this article lets discuss the step by step implementation of SCD Type 3 using Informatica PowerCenter.

The number of records we store in SCD Type 3 do not increase exponentially as we do not insert a record for each and every historical record. Hence we may not need the performance improvement techniques used in the SCD Type 2 Tutorial.

Understand the Staging and Dimension Table.


For our demonstration purpose, lets consider the CUSTOMER Dimension. Here we will keep previous version of CITY, STATE, ZIP into its corresponding PREV columns. Below are the detailed structure of both staging and dimension table.
Staging Table
In our staging table, we have all the columns required for the dimension table attributes. So no other tables other than Dimension table will be involved in the mapping. Below is the structure of our staging table.
Informatica Source Definition

Key Points 

  1. Staging table will have only one days data. Change Data Capture is not in scope.
  2. Data is uniquely identified using CUST_ID.
  3. All attribute required by Dimension Table is available in the staging table

    Dimension Table

    Here is the structure of our Dimension table.
    Informatica Target Definition

    Key Points

    1. CUST_KEY is the surrogate key.
    2. CUST_ID is the Natural key, hence the unique record identifier.
    3. Previous versions are kept in PREV_CITY, PREV_STATE, PREV_ZIP columns.

    Mapping Building and Configuration

    Step 1
    Lets start the mapping building process. For that pull the CUST_STAGE source definition into the mapping designer.
    Slowly Changing Dymention Type 3
    Step 2
    Now using a LookUp Transformation fetch the existing Customer columns from the dimension table T_DIM_CUST. This lookup will give NULL values if the customer is not already existing in the Dimension tables.
    • LookUp Condition : IN_CUST_ID = CUST_ID
    • Return Columns : CUST_KEY, CITY, STATE, ZIP
    Slowly Changing Dymention Type 3
    Step 3
    Using an Expression Transformation, identify the records for Insert and Update using below expression. Additionally, map the columns from the LookUp Transformation to the Expression as shown below.  With this we get both  the previous and current values of the CUST_ID.
      • INS_UPD :- IIF(ISNULL(CUST_KEY),'INS', IIF(CITY <> PREV_CITY OR STATE <> PREV_STATE OR ZIP <> PREV_ZIP, 'UPD'))   
    Additionally create two output ports.
      • CREATE_DT :- SYSDATE
      • UPDATE_DT :- SYSDATE
    Note : If in case there are too many columns to be compared  to build the INS_UPD logic, make use of CheckSum Number (MD5() Function) to make it simple.       
      Slowly Changing Dymention Type 3
      Step 4
      Map the columns from the Expression Transformation to a Router Transformation and create two groups (INSERT, UPDATE) in Router Transformation using the below expression. The mapping will look like shown in the image.
      • INSERT :- IIF(INS_UPD='INS',TRUE,FALSE)
      • UPDATE :- IIF(INS_UPD='UPD',TRUE,FALSE)
      Slowly Changing Dymention Type 3

      INSERT Group

      Step 5
      Every records coming through the 'INSERT Group' will be inserted into the Dimension table T_DIM_CUST.

      Use a Sequence generator transformation to generate surrogate key CUST_KEY as shown in below image. And map the columns from the Router Transformation to the target. Leave all 'PREV' columns unmapped as shown below image.
      Slowly Changing Dymention Type 3
      Note : Update Strategy is not required, if the records are set for Insert.

      UPDATE Group

      Step 6
      Records coming from the 'UPDATE Group' will update the customer Dimension with Current customer attributes and the 'PREV' attributes. Add an Update Strategy Transformation before the target instance and set it as DD_UPDATE. Below is the structure of the mapping.

      Slowly Changing Dymention Type 3
      We are done with the mapping building and below is the structure of the completed mapping.
      Slowly Changing Dymention Type 3

      Workflow and Session Creation

      There is not any specific properties required to be given during the session configuration. 
      informatica worklet
      Below is a sample data set taken from the Dimension table T_DIM_CUST. See the highlighted values.
      Slowly Changing Dymention Type 3

      SCD Type 2

      Slowly Changing Dimension Type 2 also known SCD Type 2 is one of the most commonly used type of Dimension table in a Data Warehouse.  SCD Type 2 dimension loads are considered to be complex mainly because of the data volume we process and because of the number of transformation we are using in the mapping. Here in this article, we will be building an Informatica PowerCenter mapping to load SCD Type 2 Dimension.

      Understand the Data Warehouse Architecture

      Before we go to the mapping design, Lets understand the high level architecture of our Data Warehouse.


      Understand the Staging and Dimension Table.
      Here we have a staging schema, which is loaded from different data sources after the required data cleansing. Warehouse Tables are loaded from the staging schema directly. Both staging tables and the warehouse tables are in two different schemas with in a single database instance.

      Staging Table

      In our staging table, we have all the columns required for the dimension table attributes. So no other tables other than Dimension table will be involved in the mapping. Below is the structure of our staging table.
      • CUST_ID
      • CUST_NAME
      • ADDRESS1
      • ADDRESS2
      • CITY
      • STATE
      • ZIP

      Key Points :

      1. Staging table will have only one days data.
      2. Data is uniquely identified using CUST_ID.
      3. All attribute required by Dimension Table is available in the staging table.

      Dimension Table

      Here is the structure of our Dimension table.
      • CUST_KEY
      • AS_OF_START_DT
      • AS_OF_END_DT
      • CUST_ID
      • CUST_NAME
      • ADDRESS1
      • ADDRESS2
      • CITY
      • STATE
      • ZIP
      • CHK_SUM_NB
      • CREATE_DT
      • UPDATE_DT

      Key Points :

      1. CUST_KEY is the surrogate key.
      2. CUST_ID, AS_OF_END_DT is the Natural key, hence the unique record identifier.
      3. Record versions are kept based on Time Range using AS_OF_START_DT, AS_OF_END_DATE
      4. Active record will have an AS_OF_END_DATE value 12-31-4000
      5. Checksum value of all dimension attribute columns are stored into the column CHK_SUM_NB

      Mapping Building and Configuration

      Now we understand the ETL Architecture, Staging Table, Dimension Table and the design considerations, we can go to the mapping development. We are splitting the mapping development into six steps.
      1. Join Staging Table and Dimension Table
      2. Data Transformation
      3. Identify Insert/Update
      4. Insert the new Records
      5. Update(Expire) the Old Version
      6. Insert the new Version of Updated Record

      1. Join Staging Table and Dimension Table

      We are going to OUTER JOIN both the Staging (Source) Table and the Dimension (Target) Table using the SQL Override below. An OUTER Join gives you all the records from the Staging table and the corresponding records from Dimension table. if it is there is no corresponding record in the Dimension table, it returns NULL values for the Dimension table columns.

      SELECT
      --Columns From Staging (Source) Tables CUST_STAGE.CUST_ID,
      CUST_STAGE.CUST_NAME,
      CUST_STAGE.ADDRESS1,
      CUST_STAGE.ADDRESS2,
      CUST_STAGE.CITY,
      CUST_STAGE.STATE,
      CUST_STAGE.ZIP,
      --Columns from Dimension (Target) Tables.
      T_DIM_CUST.CUST_KEY,
      T_DIM_CUST.CHK_SUM_NB
      FROM CUST_STAGE LEFT OUTER JOIN T_DIM_CUST
      ON CUST_STAGE.CUST_ID = T_DIM_CUST.CUST_ID  -- Join On the Natural Key
      AND T_DIM_CUST.AS_OF_END_DT = TO_DATE('12-31-4000','MM-DD-YYYY') – Get the active record.


      2.  Data Transformation

      Now map the columns from the Source Qualifier to an Expression Transformation. When you map the columns to the Expression Transformation, rename the ports from Dimension Table with OLD_CUST_KEY, CUST_CHK_SUM_NB and add below expressions.
      • Generate Surrogate Key : A surrogate key will be generated for each and every record inserted in to theDimension table
        • CUST_KEY : Is the surrogate key, This will be generated using a Sequence Generator Transformation
      • Generate Checksum Number : Checksum number of all dimension attributes. Difference in the Checksum value between the incoming and Checksum of the Dimension table record will indicate a changed column value. This is an easy way to identify changes in the columns than comparing each and every column.
        • CHK_SUM_NB : MD5(TO_CHAR(CUST_ID) || CUST_NAME || ADDRESS1 || ADDRESS2 || CITY || STATE || TO_CHAR(ZIP))
      • Other Calculations :
        • Effective Start Date : Effective start date of the Record
          • AS_OF_START_DT :  TRUNC(SYSDATE)
        • Effective end date  : Effective end date of the Record,   
          • AS_OF_END_DT : TO_DATE('12-31-4000','MM-DD-YYYY')
        • Record creation date : Record creation timestamp, this will be used for the records inserted
          • CREATE_DT :  TRUNC(SYSDATE)
        • Record updating date : Record updating timestamp, this will be used for records updated.
          • UPDATE_DT :  TRUNC(SYSDATE)

      3. Identify Insert/Update

      In this step we will identify the records for INSERT and UPDATE.
      • INSERT : A record will be set for INSERT if the record is not exist in the Dimension Table, We can identify the New records if  OLD_CUST_KEY is NULL, which is the column from the Dimension table
      • UPDATE : A record will be set for UPDATE, if the record is already existing in the Dimension table and any of the incoming column from staging table has a new value.  If the column OLD_CUST_KEY is not null and the Checksum of the incoming record is different from the Checksum of the existing record (OLD_CHK_SUM_NB <> CHK_SUM_NB), the record will be set for UPADTE
        • Following expression will be used in the Expression Transformation port INS_UPD_FLG shown in the previous step
        • INS_UPD_FLG : IIF(ISNULL(OLD_CUST_KEY), 'I', IIF(NOT ISNULL(OLD_CUST_KEY) AND OLD_CHK_SUM_NB <> CHK_SUM_NB, 'U'))
      Now map all the columns from the Expression Transformation to a Router and add two groups as below
        • INSERT : IIF(INS_UPD_FLG = 'I', TRUE, FALSE)
        • UPDATE : IIF(INS_UPD_FLG = 'U', TRUE, FALSE)

      4. Insert The new Records

      Now map all the columns from the ‘INSERT’ group to the Dimension table instance T_DIM_CUST. While mapping the columns, we don’t need any column named OLD_, which is pulled from the Dimension table.


      5. Update(Expire) the Old Version

      The records which are identified for UPDATE will be inserted into a temporary table T_DIM_CUST_TEMP. These records will then be updated into T_DIM_CUST as a post session SQL.  You can learn more about this performance improvement technique from one of our previous post.

      We will be mapping below columns from ‘UPDATE’ group of the Router Transformation to the target table. To update(expire) the old record we just need the columns below list.
        • OLD_CUST_KEY : To uniquely identify  the Dimension Column.
        • UPDATE_DATE : Audit column to know the record update date.
        • AS_OF_END_DT : Record will be expired with previous days date.
      While we map the columns, AS_OF_END_DT will be calculated as ADD_TO_DATE(TRUNC(SYSDATE),'DD',-1) in an Expression Transformation. Below image gives the picture of the mapping.


      6. Insert the new Version of Updated Record

      The records which are identified as UPDATE will have to have a new(active) version inserted.  Map all the ports from the ‘UPDATE’ group of the Router Transformation to target instance T_DIM_CUST. While mapping the columns, we don’t need any column named OLD_, which is pulled from the Dimension table.


      Workflow and Session Creation

      During the session configuration process, add the below SQL as part of the Post session SQL statement as shown below. This correlated update SQL will update the records in T_DIM_CUST table with the values from T_DIM_CUST_TEMP. Like we mentioned previously, this is a performance improvement technique used to update huge tables.
      UPDATE T_DIM_CUST SET
      (T_DIM_CUST.AS_OF_END_DT,
      T_DIM_CUST.UPDATE_DT) =

      (SELECT
      T_DIM_CUST_TEMP.AS_OF_END_DT,
      T_DIM_CUST_TEMP.UPDATE_DT
      FROM T_DIM_CUST_TEMP
      WHERE T_DIM_CUST_TEMP.CUST_KEY = T_DIM_CUST.CUST_KEY) 
      WHERE EXISTS
      (SELECT 1
      FROM T_DIM_CUST_TEMP
      WHERE T_DIM_CUST_TEMP.CUST_KEY = T_DIM_CUST.CUST_KEY)

      Now lets look at the data see how it looks from the below image.


      SCD Type 1 Implementation using Informatica PowerCenter

      Unlike SCD Type 2, Slowly Changing Dimension Type 1 do not preserve any history versions of data. This methodology overwrites old data with new data, and therefore stores only the most current information. In this article lets discuss the step by step implementation of SCD Type 1 using Informatica PowerCenter.

      The number of records we store in SCD Type 1 do not increase exponentially as this methodology overwrites old data with new data  Hence we may not need the performance improvement techniques used in the SCD Type 2 Tutorial.

      Understand the Staging and Dimension Table.

      For our demonstration purpose, lets consider the CUSTOMER Dimension. Below are the detailed structure of both staging and dimension table.
      Staging Table
      In our staging table, we have all the columns required for the dimension table attributes. So no other tables other than Dimension table will be involved in the mapping. Below is the structure of our staging table.
      Informatica Source Definition

      Key Points

      1. Staging table will have only one days data. Change Data Capture is not in scope.
      2. Data is uniquely identified using CUST_ID.
      3. All attribute required by Dimension Table is available in the staging table

      Dimension Table

      Here is the structure of our Dimension table.
      SCD Type 1 Implementation using Informatica

      Key Points

      1. CUST_KEY is the surrogate key.
      2. CUST_ID is the Natural key, hence the unique record identifier.

      Mapping Building and Configuration

      Step 1
      Lets start the mapping building process. For that pull the CUST_STAGE source definition into the mapping designer.
      Slowly Changing Dymention Type 1
      Step 2
      Now using a LookUp Transformation fetch the existing Customer columns from the dimension table T_DIM_CUST. This lookup will give NULL values if the customer is not already existing in the Dimension tables.
      • LookUp Condition : IN_CUST_ID = CUST_ID
      • Return Columns : CUST_KEY
      Slowly Changing Dymention Type 1
      Step 3
      Use an Expression Transformation to identify the records for Insert and Update using below expression. 
        • INS_UPD :- IIF(ISNULL(CUST_KEY),'INS', 'UPD')    
      Additionally create two output ports.
        • CREATE_DT :- SYSDATE
        • UPDATE_DT :- SYSDATE
      See the structure of the mapping in below image.
      Slowly Changing Dymention Type 1
      Step 4
      Map the columns from the Expression Transformation to a Router Transformation and create two groups (INSERT, UPDATE) in Router Transformation using the below expression. The mapping will look like shown in the image.
      • INSERT :- IIF(INS_UPD='INS',TRUE,FALSE)
      • UPDATE :- IIF(INS_UPD='UPD',TRUE,FALSE)
      Slowly Changing Dymention Type 1

      INSERT Group

      Step 5
      Every records coming through the 'INSERT Group' will be inserted into the Dimension table T_DIM_CUST.

      Use a Sequence generator transformation to generate surrogate key CUST_KEY as shown in below image. And map the columns from the Router Transformation to the target as shown below image.
      Slowly Changing Dymention Type 1

      Note : Update Strategy is not required, if the records are set for Insert.

      UPDATE Group

      Step 6
      Records coming from the 'UPDATE Group' will update the customer Dimension with the latest customer attributes. Add an Update Strategy Transformation before the target instance and set it as DD_UPDATE. Below is the structure of the mapping.
      Slowly Changing Dymention Type 1
      We are done with the mapping building and below is the structure of the completed mapping.
      Slowly Changing Dymention Type 1

      Workflow and Session Creation

      There is not any specific properties required to be given during the session configuration.
      informatica worklet
      Below is a sample data set taken from the Dimension table T_DIM_CUST.
      Initial Inserted Value for CUSTI_ID 1003
      Slowly Changing Dymention Type 1
      Updated Value for CUSTI_ID 1003
      Slowly Changing Dymention Type 1