Wednesday, June 26, 2013

Transaction Control

Power Center lets you control commit and roll back transactions based on a set of rows that pass through a Transaction Control transformation. A transaction is the set of rows bound by commit or roll back rows. You can define a transaction based on a varying number of input rows. You might want to define transactions based on a group of rows ordered on a common key, such as employee ID or order entry date.
In Power Center, you define transaction control at the following levels:
  • Within a mapping. Within a mapping, you use the Transaction Control transformation to define a transaction. You define transactions using an expression in a Transaction Control transformation. Based on the return value of the expression, you can choose to commit, roll back, or continue without any transaction changes.
  • Within a session. When you configure a session, you configure it for user-defined commit. You can choose to commit or roll back a transaction if the Integration Service fails to transform or write any row to the target.
When you run the session, the Integration Service evaluates the expression for each row that enters the transformation. When it evaluates a commit row, it commits all rows in the transaction to the target or targets. When the Integration Service evaluates a roll back row, it rolls back all rows in the transaction from the target or targets. If the mapping has a flat file target you can generate an output file each time the Integration Service starts a new transaction. You can dynamically name each target flat file.
Properties Tab

On the Properties tab, you can configure the following properties:
  • Transaction control expression
  • Tracing level
Enter the transaction control expression in the Transaction Control Condition field. The transaction control expression uses the IIF function to test each row against the condition. Use the following syntax for the expression:
IIF (condition, value1, value2)

The expression contains values that represent actions the Integration Service performs based on the return value of the condition. The Integration Service evaluates the condition on a row-by-row basis. The return value determines whether the Integration Service commits, rolls back, or makes no transaction changes to the row.
When the Integration Service issues a commit or roll back based on the return value of the expression, it begins a new transaction. Use the following built-in variables in the Expression Editor when you create a transaction control expression:
  • TC_CONTINUE_TRANSACTION. The Integration Service does not perform any transaction change for this row. This is the default value of the expression.
  • TC_COMMIT_BEFORE. The Integration Service commits the transaction, begins a new transaction, and writes the current row to the target. The current row is in the new transaction.
  • TC_COMMIT_AFTER. The Integration Service writes the current row to the target, commits the transaction, and begins a new transaction. The current row is in the committed transaction.
  • TC_ROLLBACK_BEFORE. The Integration Service rolls back the current transaction, begins a new transaction, and writes the current row to the target. The current row is in the new transaction.
  • TC_ROLLBACK_AFTER. The Integration Service writes the current row to the target, rolls back the transaction, and begins a new transaction. The current row is in the rolled back transaction.
If the transaction control expression evaluates to a value other than commit, roll back, or continue, the Integration Service fails the session.
Mapping Guidelines and Validation

Use the following rules and guidelines when you create a mapping with a Transaction Control transformation:
  • If the mapping includes an XML target, and you choose to append or create a new document on commit, the input groups must receive data from the same transaction control point.
  • Transaction Control transformations connected to any target other than relational, XML, or dynamic MQSeries targets are ineffective for those targets.
  • You must connect each target instance to a Transaction Control transformation.
  • You can connect multiple targets to a single Transaction Control transformation.
  • You can connect only one effective Transaction Control transformation to a target.
  • You cannot place a Transaction Control transformation in a pipeline branch that starts with a Sequence Generator transformation.
  • If you use a dynamic Lookup transformation and a Transaction Control transformation in the same mapping, a rolled-back transaction might result in unsynchronized target data.
  • A Transaction Control transformation may be effective for one target and ineffective for another target. If each target is connected to an effective Transaction Control transformation, the mapping is valid.
  • Either all targets or none of the targets in the mapping should be connected to an effective Transaction Control transformation.
Example to Transaction Control:

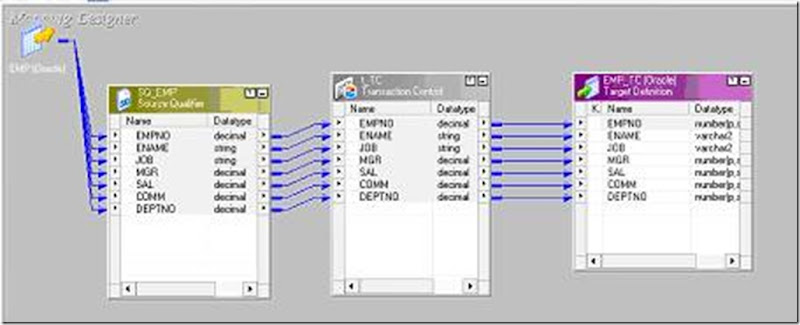
Step 1: Design the mapping.
clip_image002
Step 2: Creating a Transaction Control Transformation.
  • In the Mapping Designer, click Transformation > Create. Select the Transaction Control transformation.
  • Enter a name for the transformation.[ The naming convention for Transaction Control transformations is TC_TransformationName].
  • Enter a description for the transformation.
  • Click Create.
  • Click Done.
  • Drag the ports into the transformation.
  • Open the Edit Transformations dialog box, and select the Ports tab.
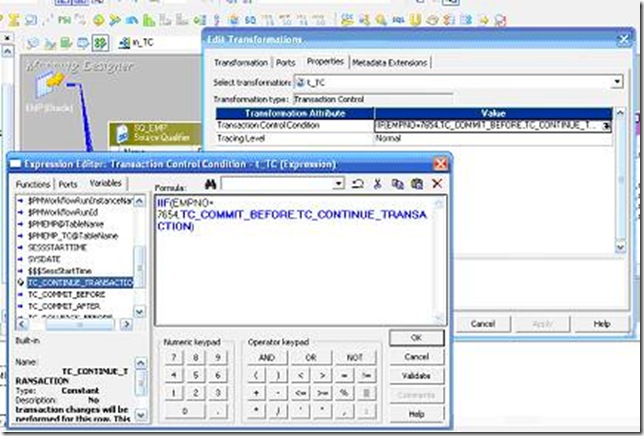
Select the Properties tab. Enter the transaction control expression that defines the commit and roll back behavior.
clip_image004
Go to the Properties tab and click on the down arrow to get in to the expression editor window. Later go to the Variables tab and Type IIF(EMpno=7654,) select the below things from the built in functions.
IIF (EMPNO=7654,TC_COMMIT_BEFORE,TC_CONTINUE_TRANSACTION)

  • Connect all the columns from the transformation to the target table and save the mapping.
  • Select the Metadata Extensions tab. Create or edit metadata extensions for the Transaction Control transformation.
  • Click OK.
Step 3: Create the task and the work flow.
Step 4: Preview the output in the target table.
clip_image006

RANK TRANSFORMATION

  • Active and connected transformation
The Rank transformation allows us to select only the top or bottom rank of data. It Allows us to select a group of top or bottom values, not just one value.
During the session, the Power Center Server caches input data until it can perform The rank calculations.
Rank Transformation Properties :
  • Cache Directory where cache will be made.
  • Top/Bottom Rank as per need
  • Number of Ranks Ex: 1, 2 or any number
  • Case Sensitive Comparison can be checked if needed
  • Rank Data Cache Size can be set
  • Rank Index Cache Size can be set
Ports in a Rank Transformation :
PortsNumber Required

Description
I1 MinimumPort to receive data from another transformation.
O1 MinimumPort we want to pass to other transformation.
Vnot neededcan use to store values or calculations to use in an expression.
ROnly 1Rank port. Rank is calculated according to it. The Rank port is an input/output port. We must link the Rank port to another transformation. Example: Total Salary

Rank Index
The Designer automatically creates a RANKINDEX port for each Rank transformation. The Power Center Server uses the Rank Index port to store the ranking position for Each row in a group.
For example, if we create a Rank transformation that ranks the top five salaried employees, the rank index numbers the employees from 1 to 5.
  • The RANKINDEX is an output port only.
  • We can pass the rank index to another transformation in the mapping or directly to a target.
  • We cannot delete or edit it.
Defining Groups
Rank transformation allows us to group information. For example: If we want to select the top 3 salaried employees of each Department, we can define a group for Department.
  • By defining groups, we create one set of ranked rows for each group.
  • We define a group in Ports tab. Click the Group By for needed port.
  • We cannot Group By on port which is also Rank Port.
1) Example: Finding Top 5 Salaried Employees
  • EMP will be source table.
  • Create a target table EMP_RANK_EXAMPLE in target designer. Structure should be same as EMP table. Just add one more port Rank_Index to store RANK INDEX.
  • Create the shortcuts in your folder.
Creating Mapping:
  1. Open folder where we want to create the mapping.
  2. Click Tools -> Mapping Designer.
  3. Click Mapping-> Create-> Give mapping name. Ex: m_rank_example
  4. Drag EMP from source in mapping.
  5. Create an EXPRESSION transformation to calculate TOTAL_SAL.
  6. Click Transformation -> Create -> Select RANK from list. Give name and click Create. Now click done.
  7. Pass ports from Expression to Rank Transformation.
  8. Edit Rank Transformation. Go to Ports Tab
  9. Select TOTAL_SAL as rank port. Check R type in front of TOTAL_SAL.
  10. Click Properties Tab and Select Properties as needed.
  11. Top in Top/Bottom and Number of Ranks as 5.
  12. Click Apply -> Ok.
  13. Drag target table now.
  14. Connect the output ports from Rank to target table.
  15. Click Mapping -> Validate
  16. Repository -> Save
  • Create Session and Workflow as described earlier. Run the Workflow and see the data in target table.
  • Make sure to give connection information for all tables.
2) Example: Finding Top 2 Salaried Employees for every DEPARTMENT
  • Open the mapping made above. Edit Rank Transformation.
  • Go to Ports Tab. Select Group By for DEPTNO.
  • Go to Properties tab. Set Number of Ranks as 2.
  • Click Apply -> Ok.
  • Mapping -> Validate and Repository Save.
Refresh the session by double clicking. Save the changed and run workflow to see the new result.
clip_image030
RANK CACHE
Sample Rank Mapping
When the Power Center Server runs a session with a Rank transformation, it compares an input row with rows in the data cache. If the input row out-ranks a Stored row, the Power Center Server replaces the stored row with the input row.
Example: Power Center caches the first 5 rows if we are finding top 5 salaried Employees. When 6th row is read, it compares it with 5 rows in cache and places it in Cache is needed.
1) RANK INDEX CACHE:
The index cache holds group information from the group by ports. If we are Using Group By on DEPTNO, then this cache stores values 10, 20, 30 etc.
  • All Group By Columns are in RANK INDEX CACHE. Ex. DEPTNO
2) RANK DATA CACHE:
It holds row data until the Power Center Server completes the ranking and is Generally larger than the index cache. To reduce the data cache size, connect Only the necessary input/output ports to subsequent transformations.
  • All Variable ports if there, Rank Port, All ports going out from RANK Transformations are stored in RANK DATA CACHE.
  • Example: All ports except DEPTNO In our mapping example.

SORTER TRANSFORMATION

  • Connected and Active Transformation
  • The Sorter transformation allows us to sort data.
  • We can sort data in ascending or descending order according to a specified sort key.
  • We can also configure the Sorter transformation for case-sensitive sorting, and specify whether the output rows should be distinct.
When we create a Sorter transformation in a mapping, we specify one or more ports as a sort key and configure each sort key port to sort in ascending or descending order. We also configure sort criteria the Power Center Server applies to all sort key ports and the system resources it allocates to perform the sort operation.
The Sorter transformation contains only input/output ports. All data passing through the Sorter transformation is sorted according to a sort key. The sort key is one or more ports that we want to use as the sort criteria.
Sorter Transformation Properties
1. Sorter Cache Size:
The Power Center Server uses the Sorter Cache Size property to determine the maximum amount of memory it can allocate to perform the sort operation. The Power Center Server passes all incoming data into the Sorter transformation Before it performs the sort operation.
  • We can specify any amount between 1 MB and 4 GB for the Sorter cache size.
  • If it cannot allocate enough memory, the Power Center Server fails the Session.
  • For best performance, configure Sorter cache size with a value less than or equal to the amount of available physical RAM on the Power Center Server machine.
  • Informatica recommends allocating at least 8 MB of physical memory to sort data using the Sorter transformation.
2. Case Sensitive:
The Case Sensitive property determines whether the Power Center Server considers case when sorting data. When we enable the Case Sensitive property, the Power Center Server sorts uppercase characters higher than lowercase characters.
3. Work Directory
Directory Power Center Server uses to create temporary files while it sorts data.
4. Distinct:
Check this option if we want to remove duplicates. Sorter will sort data according to all the ports when it is selected.
clip_image002
Example: Sorting data of EMP by ENAME
  • Source is EMP table.
  • Create a target table EMP_SORTER_EXAMPLE in target designer. Structure same as EMP table.
  • Create the shortcuts in your folder.
Creating Mapping:
1. Open folder where we want to create the mapping.
2. Click Tools -> Mapping Designer.
3. Click Mapping-> Create-> Give mapping name. Ex: m_sorter_example
4. Drag EMP from source in mapping.
5. Click Transformation -> Create -> Select Sorter from list. Give name and click Create. Now click done.
6. Pass ports from SQ_EMP to Sorter Transformation.
7. Edit Sorter Transformation. Go to Ports Tab
8. Select ENAME as sort key. CHECK mark on KEY in front of ENAME.
9. Click Properties Tab and Select Properties as needed.
10. Click Apply -> Ok.
11. Drag target table now.
12. Connect the output ports from Sorter to target table.
13. Click Mapping -> Validate
14. Repository -> Save
  • Create Session and Workflow as described earlier. Run the Workflow and see the data in target table.
  • Make sure to give connection information for all tables.
Sample Sorter Mapping :
clip_image002[5]
Performance Tuning:
Sorter transformation is used to sort the input data.
  1. While using the sorter transformation, configure sorter cache size to be larger than the input data size.
  2. Configure the sorter cache size setting to be larger than the input data size while Using sorter transformation.
  3. At the sorter transformation, use hash auto keys partitioning or hash user keys Partitioning.

ROUTER TRANSFORMATION

  • Active and connected transformation.
A Router transformation is similar to a Filter transformation because both transformations allow you to use a condition to test data. A Filter transformation tests data for one condition and drops the rows of data that do not meet the Condition. However, a Router transformation tests data for one or more conditions And gives you the option to route rows of data that do not meet any of the conditions to a default output group.
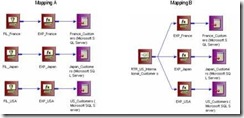
Example: If we want to keep employees of France, India, US in 3 different tables, then we can use 3 Filter transformations or 1 Router transformation.
clip_image001
Mapping A uses three Filter transformations while Mapping B produces the same result with one Router transformation.
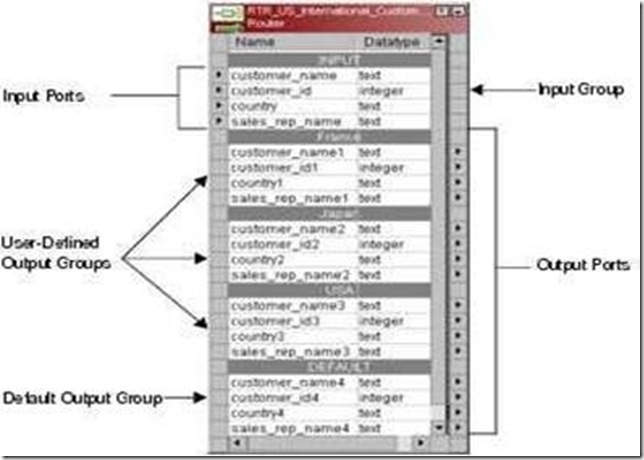
A Router transformation consists of input and output groups, input and output ports, group filter conditions, and properties that we configure in the Designer.
clip_image003
clip_image005
Working with Groups
A Router transformation has the following types of groups:
  • Input: The Group that gets the input ports.
  • Output: User Defined Groups and Default Group. We cannot modify or delete Output ports or their properties.
User-Defined Groups: We create a user-defined group to test a condition based on incoming data. A user-defined group consists of output ports and a group filter Condition. We can create and edit user-defined groups on the Groups tab with the Designer. Create one user-defined group for each condition that we want to specify.
The Default Group: The Designer creates the default group after we create one new user-defined group. The Designer does not allow us to edit or delete the default group. This group does not have a group filter condition associated with it. If all of the conditions evaluate to FALSE, the IS passes the row to the default group.
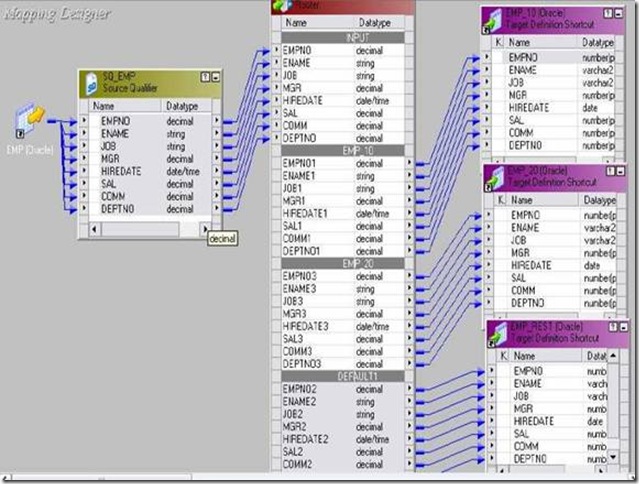
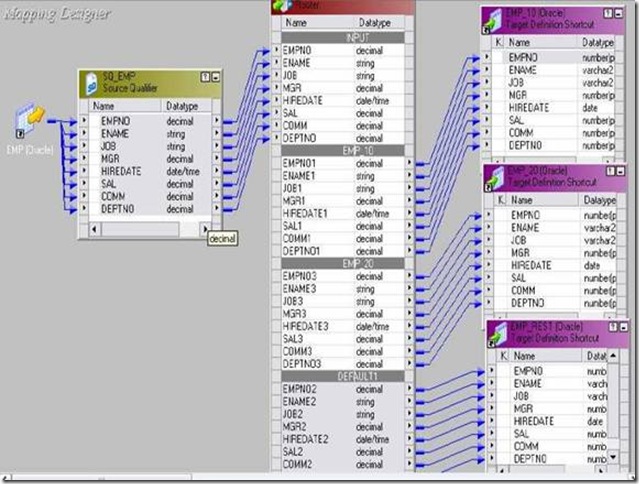
Example: Filtering employees of Department 10 to EMP_10, Department 20 to EMP_20 and rest to EMP_REST
  • Source is EMP Table.
  • Create 3 target tables EMP_10, EMP_20 and EMP_REST in shared folder. Structure should be same as EMP table.
  • Create the shortcuts in your folder.
Creating Mapping:
1. Open folder where we want to create the mapping.
2. Click Tools -> Mapping Designer.
3. Click Mapping-> Create-> Give mapping name. Ex: m_router_example
4. Drag EMP from source in mapping.
5. Click Transformation -> Create -> Select Router from list. Give name and
Click Create. Now click done.
6. Pass ports from SQ_EMP to Router Transformation.
7. Edit Router Transformation. Go to Groups Tab
8. Click the Groups tab, and then click the Add button to create a user-defined Group. The default group is created automatically..
9. Click the Group Filter Condition field to open the Expression Editor.
10. Enter a group filter condition. Ex: DEPTNO=10
11. Click Validate to check the syntax of the conditions you entered.
clip_image035
12. Create another group for EMP_20. Condition: DEPTNO=20
13. The rest of the records not matching the above two conditions will be passed to DEFAULT group. See sample mapping
14. Click OK -> Click Apply -> Click Ok.
15. Now connect the ports from router to target tables.
16. Click Mapping -> Validate
17. Repository -> Save
  • Create Session and Workflow as described earlier. Run the Workflow and see the data in target table.
  • Make sure to give connection information for all 3 target tables.
Sample Mapping:
clip_image002
Difference between Router and Filter :
We cannot pass rejected data forward in filter but we can pass it in router. Rejected data is in Default Group of router.

EXPRESSION TRANSFORMATION

  • Passive and connected transformation.
Use the Expression transformation to calculate values in a single row before we write to the target. For example, we might need to adjust employee salaries, concatenate first and last names, or convert strings to numbers.
Use the Expression transformation to perform any non-aggregate calculations.
Example: Addition, Subtraction, Multiplication, Division, Concat, Uppercase conversion, lowercase conversion etc.
We can also use the Expression transformation to test conditional statements before we output the results to target tables or other transformations. Example: IF, Then, Decode
There are 3 types of ports in Expression Transformation:
  • Input
  • Output
  • Variable: Used to store any temporary calculation.
Calculating Values :
To use the Expression transformation to calculate values for a single row, we must include the following ports:
  • Input or input/output ports for each value used in the calculation: For example: To calculate Total Salary, we need salary and commission.
  •  Output port for the expression: We enter one expression for each output port. The return value for the output port needs to match the return value of the expression.
We can enter multiple expressions in a single Expression transformation. We can create any number of output ports in the transformation.
Example: Calculating Total Salary of an Employee
  • Import the source table EMP in Shared folder. If it is already there, then don’t  import.
  • In shared folder, create the target table Emp_Total_SAL. Keep all ports as in EMP table except Sal and Comm in target table. Add Total_SAL port to store the calculation.
  • Create the necessary shortcuts in the folder.
clip_image001
Creating Mapping:
  1. Open folder where we want to create the mapping.
  2. Click Tools -> Mapping Designer.
  3. Click Mapping -> Create -> Give mapping name. Ex: m_totalsal
  4. Drag EMP from source in mapping.
  5. Click Transformation -> Create -> Select Expression from list. Give name and click Create. Now click done.
  6. Link ports from SQ_EMP to Expression Transformation.
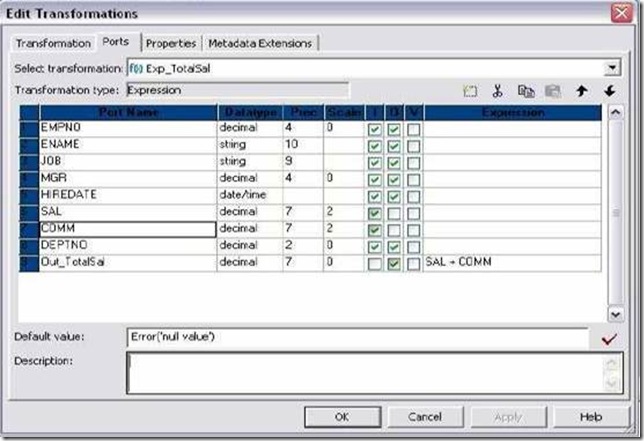
  7. Edit Expression Transformation. As we do not want Sal and Comm in target, remove check from output port for both columns.
  8. Now create a new port out_Total_SAL. Make it as output port only.
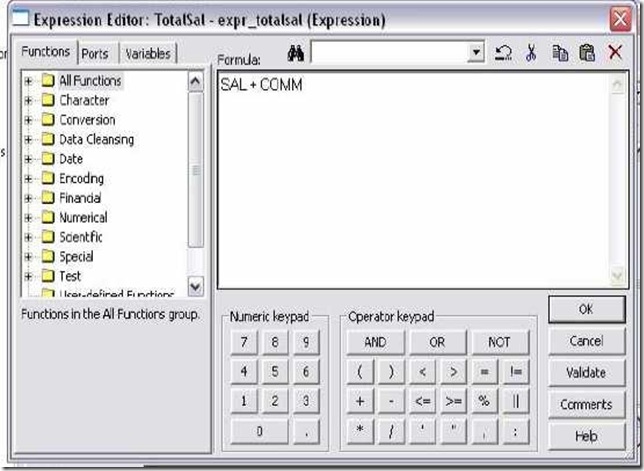
  9. Click the small button that appears in the Expression section of the dialog box and enter the expression in the Expression Editor.
  10. Enter expression SAL + COMM. You can select SAL and COMM from Ports tab in expression editor.
  11. Check the expression syntax by clicking Validate.
  12. Click OK -> Click Apply -> Click Ok.
  13. Now connect the ports from Expression to target table.
  14. Click Mapping -> Validate
  15. Repository -> Save
Create Session and Workflow as described earlier. Run the workflow and see the data in target table.
clip_image031
As COMM is null, Total_SAL will be null in most cases. Now open your mapping and expression transformation. Select COMM port, In Default Value give 0. Now apply changes. Validate Mapping and Save.
Refresh the session and validate workflow again. Run the workflow and see the result again.
Now use ERROR in Default value of COMM to skip rows where COMM is null.
Syntax: ERROR(‘Any message here’)
Similarly, we can use ABORT function to abort the session if COMM is null.
Syntax: ABORT(‘Any message here’)
Make sure to double click the session after doing any changes in mapping. It will prompt that mapping has changed. Click OK to refresh the mapping. Run workflow after validating and saving the workflow.
Performance tuning :

Expression transformation is used to perform simple calculations and also to do Source lookups.
  1. Use operators instead of functions.
  2. Minimize the usage of string functions.
  3. If we use a complex expression multiple times in the expression transformer, then Make that expression as a variable. Then we need to use only this variable for all computations.

FILTER TRANSFORMATION

  • Active and connected transformation.
We can filter rows in a mapping with the Filter transformation. We pass all the rows from a source transformation through the Filter transformation, and then enter a Filter condition for the transformation. All ports in a Filter transformation are input/output and only rows that meet the condition pass through the Filter Transformation.
clip_image001
Example: to filter records where SAL>2000
  • Import the source table EMP in Shared folder. If it is already there, then don’t Import.
  • In shared folder, create the target table Filter_Example. Keep all fields as in EMP table.
  • Create the necessary shortcuts in the folder.
Creating Mapping:
  1. Open folder where we want to create the mapping.
  2. Click Tools -> Mapping Designer.
  3. Click Mapping -> Create -> Give mapping name. Ex: m_filter_example
  4. Drag EMP from source in mapping.
  5. Click Transformation -> Create -> Select Filter from list. Give name and click  Create. Now click done.
  6. Pass ports from SQ_EMP to Filter Transformation.
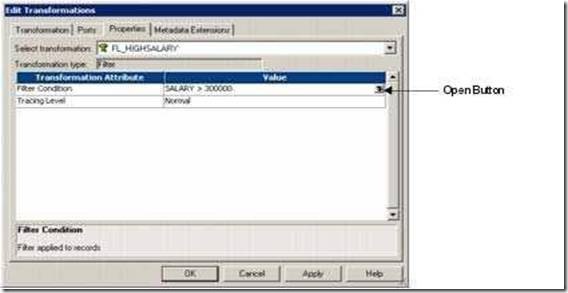
  7. Edit Filter Transformation. Go to Properties Tab
  8. Click the Value section of the Filter condition, and then click the Open button.
  9. The Expression Editor appears.
  10. Enter the filter condition you want to apply.
  11. Click Validate to check the syntax of the conditions you entered.
  12. Click OK -> Click Apply -> Click Ok.
  13. Now connect the ports from Filter to target table.
  14. Click Mapping -> Validate
  15. Repository -> Save
clip_image003
Create Session and Workflow as described earlier. Run the workflow and see the data in target table.
How to filter out rows with null values?
To filter out rows containing null values or spaces, use the ISNULL and IS_SPACES Functions to test the value of the port. For example, if we want to filter out rows that  Contain NULLs in the FIRST_NAME port, use the following condition:
IIF (ISNULL (FIRST_NAME), FALSE, TRUE)
This condition states that if the FIRST_NAME port is NULL, the return value is FALSE and the row should be discarded. Otherwise, the row passes through to the next Transformation.
Performance tuning:
Filter transformation is used to filter off unwanted fields based on conditions we Specify.
  1. Use filter transformation as close to source as possible so that unwanted data gets Eliminated sooner.
  2. If elimination of unwanted data can be done by source qualifier instead of filter,Then eliminate them at Source Qualifier itself.
  3. Use conditional filters and keep the filter condition simple, involving TRUE/FALSE or 1/0

Monday, June 24, 2013

About Transformation

A transformation is a repository object that generates, modifies, or passes data. The Designer provides a set of transformations that perform specific functions. For example, an Aggregator transformation performs calculations on groups of data.
Transformations in a mapping represent the operations the Integration Service performs on the data. Data passes through transformation ports that you link in a mapping or mapplet.
Transformations can be active or passive. An active transformation can change the number of rows that pass through it, such as a Filter transformation that removes rows that do not meet the filter condition. A passive transformation does not change the number of rows that pass through it, such as an Expression transformation that performs a calculation on data and passes all rows through the transformation.
Transformations can be connected to the data flow, or they can be unconnected. An unconnected transformation is not connected to other transformations in the mapping. An unconnected transformation is called within another transformation, and returns a value to that transformation.

Parameter File in Informatica

1.    A parameter file contains a list of parameters and variables with their assigned values.
§  $$LOAD_SRC=SAP
§  $$DOJ=01/01/2011 00:00:01
§  $PMSuccessEmailUser=admin@mycompany.com
2.    Each heading section identifies the Integration Service, Folder, Workflow, Worklet, or Session to which the parameters or variables apply.
§  [Global]
§  [Folder_Name.WF:Workflow_Name.WT:Worklet_Name.ST:Session_Name]
§  [Session_Name]
3.    Define each parameters and variables definition in the form name=value pair on a new line directly below the heading section. The order of the parameters and variables is not important within the section.
4.  [Folder_Name.WF:Workflow_Name.ST:Session_Name]
5.  $DBConnection_SRC=Info_Src_Conn
6.  $DBConnection_TGT=Info_Tgt_Conn
7.  $$LOAD_CTRY=IND
8.  $Param_Src_Ownername=ODS
9.  $Param_Src_Tablename=EMPLOYEE_IND
10.  The Integration Service interprets all characters between the beginning of the line and the first equal signs as the parameter name and all characters between the first equals sign and the end of the line as the parameter value. If we leave a space between the parameter name and the equals sign, Integration Service interprets the space as a part of the parameter name.
11.  If a line contains multiple equal signs, Integration Service interprets all equals signs after the first one as part of the parameter value.
12.  Do not enclose parameter or variable values in quotes as Integration Service interprets everything after the first equals sign as part of the value.
13.  Do not leave unnecessary line breaks or spaces as Integration Service interprets additional spaces as part of a parameter name or value.
14.  Mapping parameter and variable names are not case sensitive.
15.  To assign a null value, set the parameter or variable value to <null> or simply leave the value blank.
§  $PMBadFileDir=<null>
§  $PMCacheDir=
16.  The Integration Service ignores lines that are not valid headings,or do not contain an equals sign character (=) as Comments.
17. ---------------------------------------
18. Created on 01/01/2011 by Admin.
19. Folder: Work_Folder
20. CTRY:SG
21. ; Above are all valid comments
22. ; because this line contains no equals sign.
23.  Precede parameters and variables used within mapplets with their corresponding mapplet name.
24. [Session_Name]
25. mapplet_name.LOAD_CTRY=SG
26. mapplet_name.REC_TYPE=D
27.  If a parameter or variable is defined in multiple sections in the parameter file, the parameter or variable with the smallest scope takes precedence over parameters or variables with larger scope.
28. [Folder_Name.WF:Workflow_Name]
29. $DBConnection_TGT=Orcl_Global
30. [Folder_Name.WF:Workflow_Name.ST:Session_Name]
31. $DBConnection_TGT=Orcl_SG
In the specified session name, the value for session parameter $DBConnection_TGT is Orcl_SG and for rest all other sessions in the workflow, the connection object used will be Orcl_Global.
Scope of Informatica Parameter File
Next we take a quick look on how we can restrict the scope of Parameters by changing the Parameter File Heading section.
1.    [Global] -> All Integration Services, Workflows, Worklets, Sessions.
2.    [Service:IntegrationService_Name] -> The Named Integration Service and Workflows, Worklets, Sessions that runs under this IS.
3.    [Service:IntegrationService_Name.ND:Node_Name]
4.    [Folder_Name.WF:Workflow_Name] -> The Named workflow and all sessions within the workflow.
5.    [Folder_Name.WF:Workflow_Name.WT:Worklet_Name] -> The Named worklet and all sessions within the worklet.
6.    [Folder_Name.WF:Workflow_Name.WT:Worklet_Name.WT:Nested_Worklet_Name] -> The Named nested worklet and all sessions within the nested worklet.
7.    [Folder_Name.WF:Workflow_Name.WT:Worklet_Name.ST:Session_Name] -> The Named Session.
8.    [Folder_Name.WF:Workflow_Name.ST:Session_Name] -> The Named Session.
9.    [Folder_Name.ST:Session_Name] -> The Named Session.
10.  [Session_Name] -> The Named Session.
Types of Parameters and Variables
There are many types of Parameters and Variables we can define. Please find below the comprehensive list:
§  Service Variables: To override the Integration Service variables such as email addresses, log file counts, and error thresholds. Examples of service variables are $PMSuccessEmailUser, $PMFailureEmailUser, $PMWorkflowLogCount, $PMSessionLogCount, and $PMSessionErrorThreshold.
§  Service Process Variables: To override the the directories for Integration Service files for each Integration Service process. Examples of service process variables are $PMRootDir, $PMSessionLogDir and $PMBadFileDir.
§  Workflow Variables: To use any variable values at workflow level. User-defined workflow variables like $$Rec_Cnt
§  Worklet Variables: To use any variable values at worklet level. User-defined worklet variables like $$Rec_Cnt. We can use predefined worklet variables like $TaskName.PrevTaskStatus in a parent workflow, but we cannot use workflow variables from the parent workflow in a worklet.
§  Session Parameters: Define values that may change from session to session, such as database connections, db owner, or file names. $PMSessionLogFile, $DynamicPartitionCount and $Param_Tgt_Tablename are user-defined session parameters. List of other built in Session Parameters:
$PMFolderName, $PMIntegrationServiceName, $PMMappingName, $PMRepositoryServiceName, $PMRepositoryUserName, $PMSessionName, PMSessionRunMode [Normal/Recovery], $PM_SQ_EMP@numAffectedRows, $PM_SQ_EMP@numAppliedRows, $PM_SQ_EMP@numRejectedRows, $PM_SQ_EMP@TableName, $PM_TGT_EMP@numAffectedRows, $PM_TGT_EMP@numAppliedRows, $PM_TGT_EMP@numRejectedRows, $PM_TGT_EMP@TableName, $PMWorkflowName, $PMWorkflowRunId, $PMWorkflowRunInstanceName.
Note: Here SQ_EMP is the Source Qualifier Name and TGT_EMP is the Target Definition.
§  Mapping Parameters: Define values that remain constant throughout a session run. Examples are $$LOAD_SRC, $$LOAD_DT. Predefined parameters examples are $$PushdownConfig.
§  Mapping Variables: Define values that changes during a session run. The Integration Service saves the value of a mapping variable to the repository at the end of each successful session run and uses that value the next time you run the session. Example $$MAX_LOAD_DT
Difference between Mapping Parameters and Variables
A mapping parameter represents a constant value that we can define before running a session. A mapping parameter retains the same value throughout the entire session. If we want to change the value of a mapping parameter between session runs we need to Update the parameter file.
A mapping variable represents a value that can change through the session. The Integration Service saves the value of a mapping variable to the repository at the end of each successful session run and uses that value the next time when we run the session. Variable functions like SetMaxVariable, SetMinVariable, SetVariable, SetCountVariable are used in the mapping to change the value of the variable. At the beginning of a session, the Integration Service evaluates references to a variable to determine the start value. At the end of a successful session, the Integration Service saves the final value of the variable to the repository. The next time we run the session, the Integration Service evaluates references to the variable to the saved value. To override the saved value, define the start value of the variable in the parameter file.
Parameterize Connection Object
First of all the most common thing we usually Parameterise is the Relational Connection Objects. Since starting from Development to Production environment the connection information obviously gets changed. Hence we prefer to go with parameterisation rather than to set the connection objects for each and every source, target and lookup every time we migrate our code to new environment.E.g.
§  $DBConnection_SRC
§  $DBConnection_TGT
If we have one source and one target connection objects in your mapping, better we relate all the Sources, Targets, Lookups and Stored Procedures with $Source and $Target connection. Next we only parameterize $Source and $Target connection information as:
§  $Source connection value with the Parameterised Connection $DBConnection_SRC
§  $Target connection value with the Parameterised Connection $DBConnection_TGT
Lets have a look how the Parameter file looks like. Parameterization can be done at folder level, workflow level, worklet level and till session level.
[WorkFolder.WF:wf_Parameterize_Src.ST:s_m_Parameterize_Src]
$DBConnection_SRC=Info_Src_Conn
$DBConnection_TGT=Info_Tgt_Conn
Here Info_Src_Conn, Info_Tgt_Conn are Informatica Relational Connection Objects.
Note: $DBConnection lets Informatica know that we are Parameterizing Relational Connection Objects.
For Application Connections use $AppConnection_Siebel, $LoaderConnection_Orcl when parameterizing Loader Connection Objects and $QueueConnection_portal for Queue Connection Objects.
In a precise manner we can use Mapping level Parameter and Variables as and when required. For example $$LOAD_SRC, $$LOAD_CTRY, $$COMISSION, $$DEFAULT_DATE, $$CDC_DT.
Parameterize Source Target Table and Owner Name
Situation may arrive when we need to use a single mapping from various different DB Schema and Table and load the data to different DB Schema and Table. Condition provided the table structure is the same.
A practical scenario may be we need to load employee information of IND, SGP and AUS and load into global datawarehouse. The source tables may be orcl_ind.emp, orcl_sgp.employee, orcl_aus.emp_aus.
So we can fully parameterise the Source and Target table name and owner name.
§  $Param_Src_Tablename
§  $Param_Src_Ownername
§  $Param_Tgt_Tablename
§  $Param_Tgt_Ownername
The Parameterfile:-
[WorkFolder.WF:wf_Parameterize_Src.ST:s_m_Parameterize_Src]
$DBConnection_SRC=Info_Src_Conn
$DBConnection_TGT=Info_Tgt_Conn
$Param_Src_Ownername=ODS
$Param_Src_Tablename=EMPLOYEE_IND
$Param_Tgt_Ownername=DWH
$Param_Tgt_Tablename=EMPLOYEE_GLOBAL
Check the implementation image below:
Parameterize Source Qualifier Attributes
Next comes what are the other attributes we can parameterize in Source Qualifier.
§  Sql Query: $Param_SQL
§  Source Filter: $Param_Filter
§  Pre SQL: $Param_Src_Presql
§  Post SQL: $Param_Src_Postsql
If we have user-defined SQL statement having join as well as filter condition, its better to add a $$WHERE clause at the end of your SQL query. Here the $$WHERE is just a Mapping level Parameter you define in your parameter file.
In general $$WHERE will be blank. Suppose we want to run the mapping for todays date or some other filter criteria, what you need to do is just to change the value of $$WHERE in Parameter file.
$$WHERE=AND LAST_UPDATED_DATE > SYSDATE -1
[WHERE clause already in override query]
OR
$$WHERE=WHERE LAST_UPDATED_DATE > SYSDATE -1
[NO WHERE clause in override query]
Parameterize Target Definition Attributes
Next what are the other attributes we can parameterize in Target Definition.
§  Update Override: $Param_UpdOverride
§  Pre SQL: $Param_Tgt_Presql
§  Post SQL: $Param_Tgt_Postsql
$Param_UpdOverride=UPDATE $$Target_Tablename.EMPLOYEE_G SET
ENAME = :TU.ENAME, JOB = :TU.JOB, MGR = :TU.MGR, HIREDATE = :TU.HIREDATE,
SAL = :TU.SAL, COMM = :TU.COMM, DEPTNO = :TU.DEPTNO
WHERE EMPNO = :TU.EMPNO
Parameterize Flatfile Attributes
Now lets see what we can do when it comes to Source, Target or Lookup Flatfiles.
§  Source file directory: $PMSourceFileDir\ [Default location SrcFiles]
§  Source filename: $InputFile_EMP
§  Source Code Page: $Param_Src_CodePage
§  Target file directory: $$PMTargetFileDir\ [Default location TgtFiles]
§  Target filename: $OutputFile_EMP
§  Reject file directory: $PMBadFileDir\ [Default location BadFiles]
§  Reject file: $BadFile_EMP
§  Target Code Page: $Param_Tgt_CodePage
§  Header Command: $Param_headerCmd
§  Footer Command: $Param_footerCmd
§  Lookup Flatfile: $LookupFile_DEPT
§  Lookup Cache file Prefix: $Param_CacheName
Parameterize FTP Connection Object Attributes
Now for FTP connection objects following are the attributes we can parameterize:
§  FTP Connection Name: $FTPConnection_SGUX
§  Remote Filename: $Param_FTPConnection_SGUX_Remote_Filename [Use the directory path and filename if directory is differnt than default directory]
§  Is Staged: $Param_FTPConnection_SGUX_Is_Staged
§  Is Transfer Mode ASCII:$Param_FTPConnection_SGUX_Is_Transfer_Mode_ASCII
Parameterization of Username and password information of connection objects are possible with $Param_OrclUname.
When it comes to password its recommended to Encrypt the password in the parameter file using the pmpasswd command line program with the CRYPT_DATA encryption type.
Using Parameter File
We can specify the parameter file name and directory in the workflow or session properties or in the pmcmd command line.
We can use parameter files with the pmcmd startworkflow or starttask commands. These commands allows us to specify the parameter file to use when we start a workflow or session.
The pmcmd -paramfile option defines which parameter file to use when a session or workflow runs. The -localparamfile option defines a parameter file on a local machine that we can reference when we do not have access to parameter files on the Integration Service machine
The following command starts workflow using the parameter file, param.txt:
pmcmd startworkflow -u USERNAME -p PASSWORD
-sv INTEGRATIONSERVICENAME -d DOMAINNAME -f FOLDER
-paramfile 'infa_shared/BWParam/param.txt'
WORKFLOWNAME
The following command starts taskA using the parameter file, param.txt:
pmcmd starttask -u USERNAME -p PASSWORD
-sv INTEGRATIONSERVICENAME -d DOMAINNAME -f FOLDER
-w WORKFLOWNAME -paramfile 'infa_shared/BWParam/param.txt'
SESSION_NAME
Workflow and Session Level Parameter File
When we define a workflow parameter file and a session parameter file for a session within the workflow, the Integration Service uses the workflow parameter file, and ignores the session parameter file. What if we want to read some parameters from Parameter file at Workflow level and some defined at Session Level parameter file.
The solution is simple:
§  Define Workflow Parameter file. Say infa_shared/BWParam/param_global.txt
§  Define Workflow Variable and assign its value in param_global.txt with the session level param file name. Say $$var_param_file=/infa_shared/BWParam/param_runtime.txt
§  In the session properties for the session, set the parameter file name to this workflow variable.
§  Add $PMMergeSessParamFile=TRUE in the Workflow level Parameter file.
Content of infa_shared/BWParam/param_global.txt
[WorkFolder.WF:wf_runtime_param]
$DBConnection_SRC=Info_Src_Conn
$DBConnection_TGT=Info_Tgt_Conn
$PMMergeSessParamFile=TRUE
$$var_param_file=infa_shared/BWParam/param_runtime.txt
Content of infa_shared/BWParam/param_runtime.txt
[WorkFolder.wf:wf_runtime_param.ST:s_m_emp_cdc]
$$start_date=2010-11-02
$$end_date=2010-12-08
The $PMMergeSessParamFile property causes the Integration Service to read both the session and workflow parameter files.